The Stashdown Square - FREE Tunisian Crochet Pattern

This post may contain affiliate links, meaning that if you click through and make a purchase, I earn a small commission at no extra cost to you. This helps support my business and makes it possible for me to bring you free content.


This unique square is part of the amazing line up of patterns in this year’s Knitter Knotter Tunisian Blanket CAL, hosted by Arunima over at www.knitterknotter.com! It’s the perfect way to use up those partial skeins and scraps while keeping the colour theme of your blanket.

What is a CAL? Well, it stands for Crochet-ALong, and as the name of this one suggests, everyone who participates in this CAL is making a blanket. Every two weeks a new 12x12”/30x30cm square pattern by a different designer will be released for free on their blog or other platforms. By the end of 2021 you’ll have made 24 completely unique Tunisian crochet squares!  For further information about the CAL, including what supplies you need and the links to all the squares, check out the main blog post. While you’re there, you can also sign up to the CAL mailing list and join the Facebook group, if you’re into that!

stashdownsquarepin2.png

This is also a great stashbusting pattern, since you can use up bits and pieces of yarn you have laying around, and there’s no concrete yardage requirement. My samples shown here use 3 different colours, but feel free to experiment and make this square your own!

Don’t forget to grab the premium, ad-free PDF on Ravelry or in my pattern shop, as it includes a detailed photo tutorial for this pattern, along with a blank chart that you can use to fill in your own colour plan. Or, you can really go wild and just wing it - it truly is a totally customizable pattern!

stashdownsquarehook.JPG

Materials

Yarn - approximately 145 yds/133m worsted (4) weight in various colours (I used 3 different colours - A, B and C - of Loops and Threads Impeccable from Michael’s Stores).

Hooks - L/11 8mm Tunisian crochet hook with 12”/30cm cord (or hook needed to meet gauge) – you will use this hook for the main part of the square; AND 7mm regular crochet hook (or two sizes/1mm down from the hook that meets gauge) – you will use this hook for the bind off row and the border. I use the Radiant Wood Interchangeable Hooks from WeCrochet, and I love them!

Notions - locking stitch marker (1), scissors, tape measure, yarn needle, blocking mats and pins.

Notes

The square is worked in four sections using the JAYG technique.  The Pattern Instructions and Colour Chart shown below will create the square exactly as pictured.  The premium, ad-free PDF has a blank chart that can be coloured in with your own custom colours, so you can vary the placement and size of your colour blocks and create unique squares with as many colours as you like!

The remaining loop on your hook after the RetP is the first stitch of each row, and is not included in the stitch count instruction (i.e., tks next 10 = the first loop is already on your hook, then work a tks in the next 10 sts, for a total of 11 loops on hook).

When you work the last (edge) st of each row, insert your hook under both vertical bars.

Sizing

Gauge: 12 sts x 14 rows = 4”/10cm in tks, blocked

Finished Measurements: approximately 12 x 12”/30 x 30cm

Terminology/Abbreviations

This pattern uses standard US terms as detailed by the Craft Yarn Council:

ch: chain

st(s): stitch(es)

sl st: slip stitch

sc: single crochet

tks: Tunisian knit stitch (insert hook between two vertical bars and pull up a loop)

JAYG: join as you go (working your square in sections)

RetP: return pass

  • Regular: ch 1, *yarn over, pull through 2 loops.  Repeat from * until 1 loop remains on hook

  • JAYG: join yarn to first st of previous section, *yarn over, pull through 2 loops.  Repeat from * until 1 loop remains on hook

RS/WS: right side/wrong side


Colour Chart

Colour A: Black Colour B: Teal Colour C: Cream

stashdownsquarechart.png

The numbers at the bottom of the chart represent the number of stitches in each section. Overall, the square is 36 stitches wide.

If your gauge is very different from mine, feel free to add or remove sts and/or rows from the fourth section in order to meet the finished measurements.


Pattern Instructions

Sections

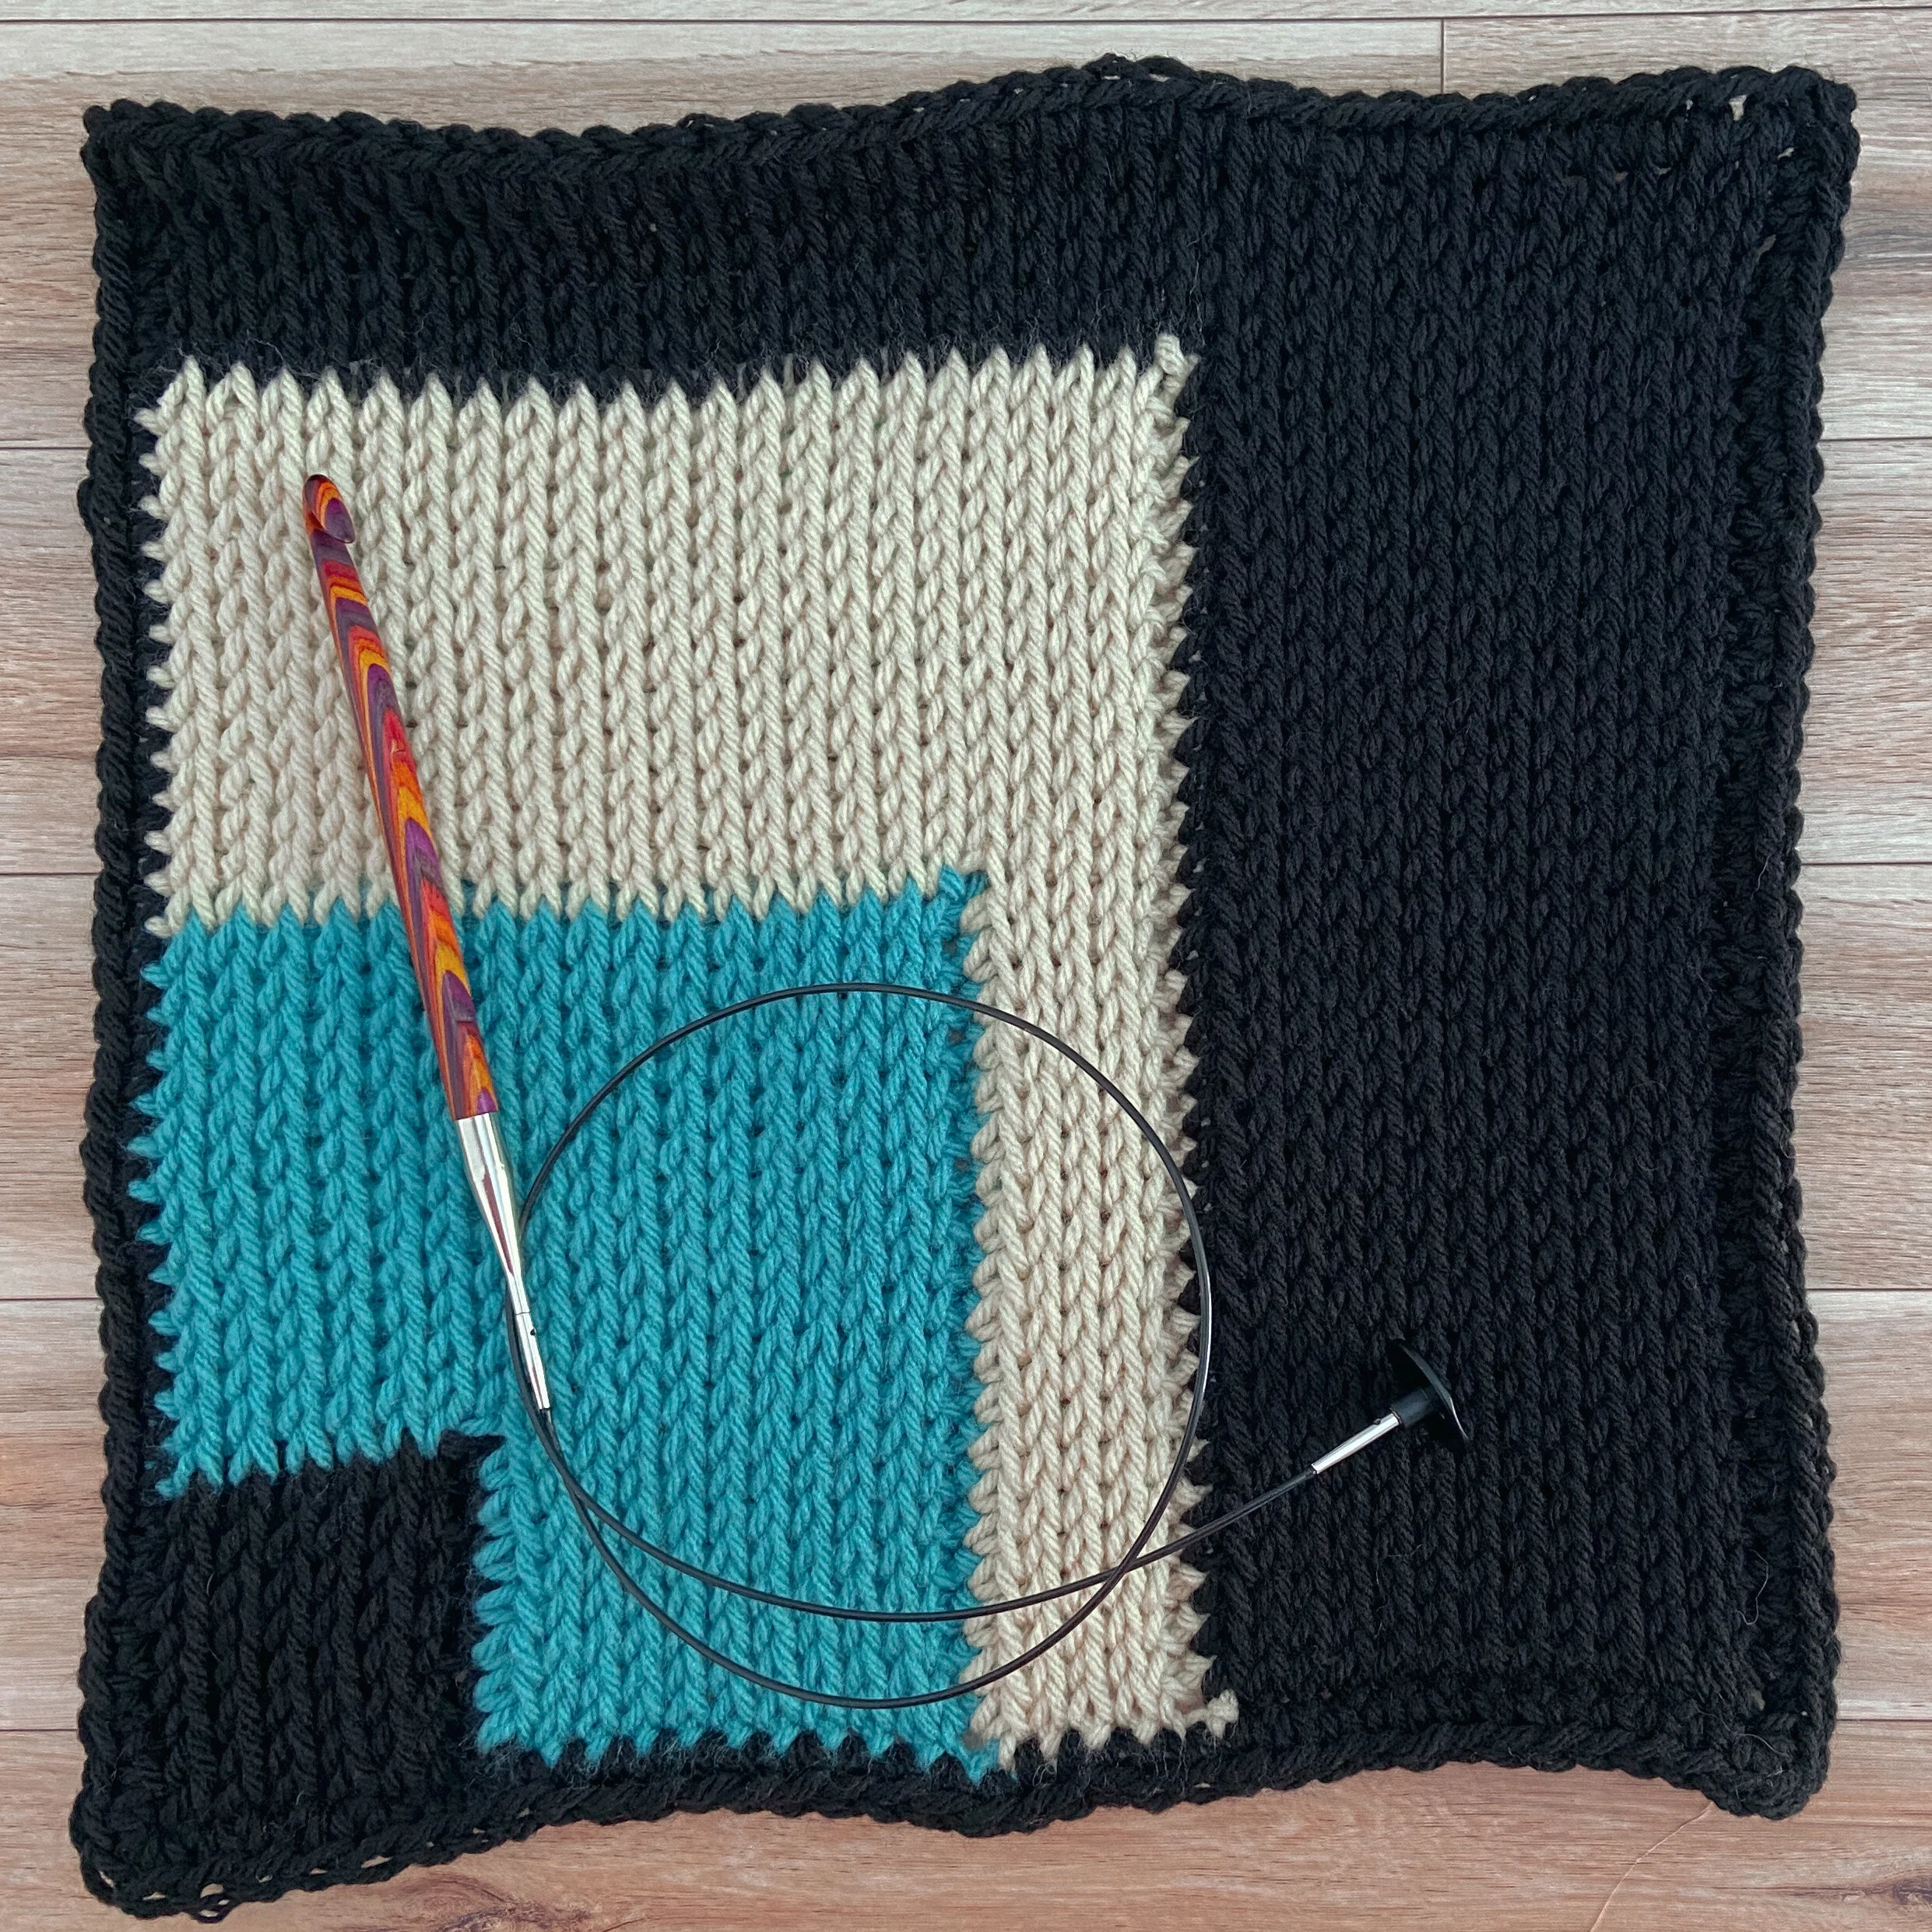
First Section (Colour A, Black)

Row 1: With larger hook, ch 7.  Starting in the second ch from hook, pull up a loop in the back bump of each ch st (7 loops on hook).  Complete a Regular RetP.

Rows 2-7: Tks each st, complete a Regular RetP.

Row 8: Tks each st.  Work the Regular RetP until 2 loops remain on your hook.  Place these 2 loops on a stitch marker and cut yarn, leaving a 4” tail.

Second Section (Colour B, Teal)

Row 1:  Join B as per JAYG instructions and ch 11.  Starting in the second ch from hook, pull up a loop in the back bump of each ch st (11 loops on hook).  Complete a JAYG RetP.

Rows 2-8:  Tks in each st, complete a JAYG RetP.

Row 9: Tks in next 10 sts, then place both loops of A on your hook.  With B, yarn over and pull through both loops of A.  Continue working tks across the top of the first section with B, then complete a Regular RetP.

Rows 10-20: Tks each st, complete a Regular RetP.

Row 21: Tks each st.  Work the Regular RetP until 2 loops remain on your hook.  Place these 2 loops on a stitch marker and cut yarn, leaving a 4” tail.

Third Section (Colour C, Cream)

Row 1:  Join C as per JAYG instructions and ch 5.  Starting in the second ch from hook, pull up a loop in the back bump of each ch st (5 loops on hook).  Complete a JAYG RetP.

Rows 2-21:  Tks in each st, complete a JAYG RetP.

Row 22: Tks in next 4 sts, then place both loops of B on your hook.  With C, yarn over and pull through both loops of B.  Continue working tks across the top of the second section with C, then complete a Regular RetP.

Rows 23-33: Tks in each st, complete a Regular RetP.

Row 34: Tks each st.  Work the Regular RetP until 2 loops remain on your hook.  Place these 2 loops on a stitch marker and cut yarn, leaving a 4” tail.

Fourth Section (Colour A, Black)

Row 1:  Join A as per JAYG instructions and ch 13.  Starting in the second ch from hook, pull up a loop in the back bump of each ch st (13 loops on hook).  Complete a JAYG RetP.

Rows 2-34:  Tks in each st, complete a JAYG RetP.

Row 35: Tks in next 12 sts, then place both loops of C on your hook.  With A, yarn over and pull through both loops of C.  Continue working tks across the top of the third section with A, then complete a Regular RetP.

Rows 36-39: Tks in each st, complete a Regular RetP.

Do not fasten off Colour A, switch to smaller hook and proceed to Border.


Border

Bind off row: Ch 1, *insert hook into next st as for tks and work a sc st.  Repeat from * across the row, until the last st.  In the last st, work 3 sc.

Rotate your square to work along the side edge, RS facing up.  In the end of each row, work a sc st until you reach the last row.  In this row, work 3 sc and rotate your square to work along the bottom.  Sc in each ch st from the foundation ch until you reach the last st.  Work 3 sc in this last st and rotate your square to work up the other side.  In the first st of each row, work a sc until you reach the last row.  Sl st to join to the ch-1 space of the Bind off row, and fasten off.


Finishing

Block your square using your preferred method.  If you’ve used an acrylic yarn (like I have), or if you find that the edges of your square are curling quite a bit, I recommend a full wet block: soak your square for 15-20 minutes in the sink or a tub of lukewarm water and a bit of wool wash.  Drain and gently squeeze out as much water as you can (do not wring or stretch).  Lay the square flat on a towel, and either fold the towel up or roll it neatly, then step on it to draw the rest of the water out of the square.  Lay it out flat, and you may pin the edges if you like to help the stitches settle.  Leave pinned until completely dry. 

When your square is dry, weave in all ends to the WS. I like to save this until the very end, so that there’s no chance of puckering or pulling during the blocking process.

stashdownsquareblocking.png

Congratulations on finishing the Stashdown Square pattern! I hope this customizable pattern helps you use up your scraps to make a beautifully coordinated square that fits nicely with the rest of your blanket. You could even make a few different ones to tie the whole thing together!

If you share your project on social media, don’t forget to tag me @capital.crochet and @knitterknotter, and use the hashtags #StashdownSquare and #KnitterKnotterTunisianBlanketCAL2021!

You may sell finished items made from this pattern, but please credit me as the designer by linking back to this blog post.

Thank you so much for your support! If you’d like to be the first to know about free patterns and other exciting news, make sure to subscribe to the newsletter below.


Save this pattern to your Ravelry queue, or add a project to the pattern page!

stashdownsquarepin3.png

Serene Snowflake Square - part of the Hope in the Holidays Mystery CAL!

This post may contain affiliate links, meaning that if you click through and make a purchase, I earn a small commission at no extra cost to you. This helps support my business and makes it possible for me to bring you free content.


Hello CAL lovers! I’m so please to be participating in the Hope in the Holidays Mystery CAL hosted by Claire of BearRye. I love coming together with other designers to create a beautiful collection of patterns that can be mixed and matched! Before you get started here, check out the CAL landing page to see all the other squares.

For my square, I wanted it to be simple but unique. I was introduced to the technique of cross-stitch on a Tunisian crochet background earlier this year, and I really enjoy how peaceful and calming these simple but repetitive stitches are. The Serene Snowflake Square is a great pattern for beginners to both Tunisian crochet and cross-stitch!

IMG_9086.jpg

This pattern is also available in PDF format in my pattern shop. Until 9am EST on 23 December, you can get the PDF for FREE! Head to the CAL landing page first to get the code, then follow the link below to my shop.


Materials

Hook - USI/9 5.5mm Tunisian hook, or interchangeable with a short cord attached. I love these interchangeable hooks and cords from WeCrochet.

Yarn - Mighty Stitch from WeCrochet. I used Alfalfa for Colour A (60yds/55m), Cream for Colour B (6yds/5.5m).

Notions - scissors, tape measure, yarn needle, blocking mats and pins.

Sizing

Gauge - 16 sts x 13 rows = 4”/10cm in tss unblocked.

Finished measurements - 8 x 8”/20.5 x 20.5cm.

Terminology/Abbreviations

This pattern uses standard US terms as detailed by the Craft Yarn Council:

Ch – chain

St(s) – stitch(es)

Sc – single crochet

Tss – Tunisian simple stitch

Lts – last Tunisian stitch (insert hook under both vertical bars of the last stitch of each row)

RetP – Return Pass (ch 1, *yarn over and pull through 2 loops.  Repeat from * until 1 loop remains on your hook)

Sl st – slip stitch

RS/WS – right side/wrong side

Notes

This pattern is worked using Colour A as the background, and Colour B for the cross-stitch.

The loop on your hook to start each row counts as the first st.

Pattern Instructions

Square

Row 1:  With Colour A, ch 31 and turn.  Starting in the second ch from hook, pull up a loop in the back bump of each ch st.  You should have 31 loops on your hook.  Complete a RetP.

Rows 2-24:  Tss in each st until last, Lts and complete a RetP.

Bind off row (Row 25 on the chart below):  Ch 1, *insert hook under next vertical bar and pull up a loop.  Yarn over, pull through 2 loops.  Repeat from * until last st.  Work a sc in the last st of the row and do not fasten off; proceed to Border.

Border:  With the RS facing, rotate your work so that you can work down the side of your rows.  2sc in the same st as your last st of the bind off row.  Sc in the end of each row and work 3 sc in the last st before turning the corner.  Sc along the bottom of the starting row and work 3 sc in the last st before turning the corner.  Sc in the first st of each row until you reach the ch-1 space from the bind off row.  Sc in the ch-1 space, then sl st into the same space.

Fasten off and block to finished measurements.  Weave in the ends after blocking, making sure to weave them in to the WS. 

Cross Stitch

With Colour B, work cross-stitch as per the chart below.

Serene Snowflake - Stitch Fiddle.jpg

Congratulations on finishing your Serene Snowflake square! I hope you have enjoyed this pattern. Share your pics on social media and tag me @capital.crochet and use the hashtag #HopeInTheHolidaysCAL.

You may sell finished items made from this pattern, but please credit me as the designer by linking back to this blog post.

Thank you so much for your support!


If you enjoyed this pattern, I thought you might be interested in a few other easy Tunisian crochet patterns, too! Shown below are the Juliet Ear Warmer and the Stashdown Pillow, both available in my pattern shop, or on Etsy and Ravelry.

In Bloom Spring Blanket CAL - Springtime Stripes

Mid-April already - I don’t know about you but I am absolutely ecstatic about the winter being over and gone. I am ok with the cold and snow until about 27 December, so by the time March/April rolls around I am SO READY for some warmth and sun!

Are you following along with the In Bloom Spring Blanket Crochet-Along (CAL), which features a new crocheted square every day in April? The CAL is hosted by my friend Claire of Bear Rye, and features some of my favourite crochet designers. You might remember my Tulip Twins Square that I shared recently. Today I’m sharing another square that can be used as a filler in your blanket, the Springtime Stripes square.

Springtime Stripes (1).png

Before you get started, head to the main landing page HERE to check out the other squares, read about the yarn we are using, and join the Facebook group!

This square is designed to compliment the rest of the squares in your blanket. Feel free to use one, two or three colours (or more!) to create beautifully textured stripes that can be placed between the main squares. The samples shown are just a few ideas on how to use the leftover yarn from this CAL to make your blanket even bigger.

Special thank you to WeCrochet for providing the yarn support for this project!

Untitled design.png

Below, you’ll find the free written pattern. If you prefer a printable pdf, a low-cost version of this pattern is available on Ravelry, and you can grab it for FREE today (14 April) only. You’ll need to check out the main landing page for the code, then head to Ravelry to get your copy.

When sharing your square on social media, use the hashtags #InBloomBlanketCAL and #SpringBloomsBlanketCAL, and don’t forget to tag me @capital.crochet on Instagram so I can see all the lovely colourful stripes!


Materials

Size G/4.00mm crochet hook (or size needed to obtain gauge)

Yarn – 75 yds of Mighty Stitch from WeCrochet, or similar worsted weight (4) yarn

Scissors, yarn needle and tape measure

Sizing

Gauge – 12 sts x 7.5 rows = 4” in DCC

Your finished square will be approximately 8” x 8”. You should aim to meet gauge as closely as possible, but to achieve exact measurements, you can block your finished square.

Terminology/Abbreviations

This pattern uses standard American (US) terms:

Ch – chain

St(s) – stitch(es)

DCC - double crochet cluster (see Special Stitch)

Special Stitch - Double Crochet Cluster

Yarn over, insert hook into next st. Yarn over and pull up a loop (3 loops on hook). Yarn over and pull through two loops, leaving two loops on the hook. Yarn over and insert hook into the same st. Yarn over and pull up a loop (4 loops on hook). Yarn over and pull through two loops, then yarn over and pull through the remaining 3 loops. Tip: the pdf pattern includes a picture tutorial to show you exactly how to do this stitch!

Notes

Ch 2 to start each row does not count as a st.

This square may be worked in a solid colour, or with stripes. When changing colours, finish the last st of the previous colour with the next colour, and cut your previous colour yarn.  This will create a clean colour change. It does mean you’ll have lots of ends to weave in, but the edges of your stripes will be neat and tidy.

There is no defined right side or wrong side for this pattern, and you’ll notice that the unique texture created by the clusters has a different look on each side. When you are finished, choose one side to be the wrong side and weave all your ends in on this side. That way if any come loose or poke out, they won’t show on the right side of your square.

Pattern

Row 1.  Loosely ch 25 and turn. In the third ch from hook, work a DCC. DCC in each ch st and turn. (23 DCC)

Row 2. Ch 2, DCC in each st across and turn. (23 DCC)

Rows 3-15. Repeat Row 2.

 Fasten off, and weave in the ends.  Block your square to 8” x 8” if necessary, and voila! It’s ready to be sewn into your blanket!

IMG_7009.jpg

Make sure to follow along each day in April on the main CAL page to get all the beautiful patterns for this CAL.

If you missed a few days, or just want to grab all the square patterns at a super discounted price, we’ve got a deal for you! You may purchase the pdfs for all 30 square patterns in one convenient bundle for $7 via my affiliate link below - that’s a savings of $23!

IMG_7022.jpg

My favourite part of a CAL like this is how all the squares are designed to go together. You can see how well the Springtime Stripes compliment the Tulip Twins!

Thank you so much for crocheting along!

In Bloom Spring Blanket CAL - Tulip Twins Square

Spring has finally arrived! Although we still have a wee bit of snow left on the ground, the robins pulling worms in the backyard confirm that warmer days are definitely on the way. I’m so happy to be part of the In Bloom Spring Blanket Crochet-Along (CAL), which runs all this month and features a new square every day. The CAL is hosted by my friend Claire of Bear Rye, and features some of my favourite crochet designers.

Flower Photo Spring Pinterest Graphic.png

Before you get started, head to the main landing page HERE to check out the other squares, see the yarn requirements, and join the Facebook group! There are also prizes to be won, so make sure to play along.

I’m so excited to introduce my first square, the Tulip Twins Square. Initially, I had planned for just one tulip, but as I worked it up it looked so lonely. And really, you never see just one solitary tulip in a garden. I love a good alliteration, so the Tulip Twins idea came really easily.

Special thank you to WeCrochet for providing the yarn support for this project!

Below, you’ll find the free written pattern. If you prefer a printable pdf with an easy-to-follow colour chart, a low-cost version of this pattern is available on Ravelry, and you can grab it for FREE today (5 April) only. You’ll need to check out the main landing page for the code, then head to Ravelry to get your copy of the pattern.

When sharing your square on social media, use the hashtags #InBloomBlanketCAL and #SpringBloomsBlanketCAL, and don’t forget to tag me @capital.crochet on Instagram so I can see your lovely Tulip Twins!


Materials

Size G/4.00mm crochet hook (or size needed to obtain gauge)

Yarn – Mighty Stitch from WeCrochet, or similar worsted weight (4) yarn - Colour A: Cream; Colour B: Alfalfa; Colour C: Wisteria

Scissors, yarn needle and tape measure

Sizing

Gauge – 14 sts x 15 rows = 4” in sc

Your finished square will be approximately 8” x 8”. You should aim to meet gauge as closely as possible, but to achieve exact measurements, you can block your finished square.

Terminology/Abbreviations

This pattern uses standard American (US) terms:

Ch – chain

St(s) – stitch(es)

Sc – single crochet

Fsc – foundation single crochet

Sl st – slip stitch

RS – right side of your work (the front of the square)

WS – wrong side of your work (the back of the square)

Notes

Ch 1 to start each row does not count as a st.

Start your project with Colour A.  When changing colours, finish the last st of the previous colour with the next colour.  This will create a clean colour change.

When carrying your main colour yarn under your contrast colour sts, try to edge it toward the WS of the square.  On RS rows, edge it to the back, and on WS rows, keep it at the front.  This will help hide it when you look at the RS of the square.

IMG_6813.jpg

Pattern

Row 1 (RS).  Fsc 35, ch 1 and turn.  If you prefer, you may ch 36 and turn, then work 35 sc into your chain.

Rows 2-4.  Sc 35, ch 1 and turn.

Row 5.  Sc 8.  Switch to Colour B, sc 2.  Switch to Colour A, sc 14.  Switch to Colour B, sc 2.  Switch to Colour A, sc 9.  Ch 1 and turn. 

For clarity, the remaining rows will be simplified to the following format:  A: 7.  Where A indicates the colour of yarn to use, and the number indicates the number of sc sts to work. TIP: the pdf version of this pattern has an easy-to-follow, colour-coded chart!

Row 6.  A: 7.  B: 4.  A: 12.  B: 4.  A: 8.  Ch 1 and turn.

Row 7.  A: 7.  B: 6.  A: 10.  B: 6.  A: 6.  Ch 1 and turn.

Row 8.  A: 6.  B: 7.  A: 9.  B: 7.  A: 6.  Ch 1 and turn.

Row 9.  A: 5.  B: 5.  A: 1.  B: 3.  A: 7.  B: 5.  A:1.  B: 3.  A: 5.  Ch 1 and turn.

Row 10.  A: 4.  B: 3.  A: 2.  B: 1.  A: 2.  B: 3.  A: 5.  B: 3.  A: 2.  B: 1.  A: 2.  B: 3.  A: 4.  Ch 1 and turn.

Row 11.  A: 4.  B: 2.  A: 3.  B: 1.  A: 2.  B: 3.  A: 5.  B: 2.  A: 3.  B: 1.  A: 2.  B: 3.  A: 4.  Ch 1 and turn.

Row 12.  A: 4.  B: 2.  A: 3.  B: 1.  A: 3.  B: 3.  A: 4.  B: 2.  A: 3.  B: 1.  A: 3.  B: 3.  A: 3.  Ch 1 and turn.

Row 13.  A: 3.  B: 2.  A: 4.  B: 1.  A: 3.  B: 3.  A: 3.  B: 2.  A: 4.  B: 1.  A: 3.  B: 3.  A: 3.  Ch 1 and turn.

Row 14.  A: 3.  B: 2.  A: 4.  B: 1.  A: 4.  B: 2.  A: 3.  B: 2.  A: 4.  B: 1.  A: 4.  B: 2.  A: 3.  Ch 1 and turn.

Row 15.  A: 3.  B: 1.  A: 5.  B: 1.  A: 4.  B: 1.  A: 4.  B: 1.  A: 5.  B: 1.  A: 4.  B: 1.  A: 4.  Ch 1 and turn.

Row 16.  A: 4.  B: 1.  A: 4.  B: 1.  A: 5.  B: 1.  A: 4.  B: 1.  A: 4.  B: 1.  A: 5.  B: 1.  A: 3.  Ch 1 and turn.

Rows 17-18.  A: 9.  B: 1.  A: 15.  B: 1.  A: 9.  Ch 1 and turn.

IMG_6901.jpg


We are now finished with Colour B, so you can fasten off and weave in that end to keep your work neat and tidy.  Starting in Row 19, we will be working with Colours A and C.

Row 19.  A: 7.  C: 5.  A: 11.  C: 5.  A: 7.  Ch 1 and turn.

Row 20.  A: 6.  C: 7.  A: 19.  C: 7.  A: 6.  Ch 1 and turn.

Rows 21-22.  A: 5.  C: 9.  A: 7.  C: 9.  A: 5.  Ch 1 and turn.

Rows 23-25.  A: 4.  C: 11.  A: 5.  C: 11.  A: 4.  Ch 1 and turn.

Row 26.  A: 4.  C: 3.  A: 1.  C: 3.  A: 1.  C: 3.  A: 5.  C: 3.  A: 1.  C: 3.  A: 1.  C: 3.  A: 4.  Ch 1 and turn.

Rows 27-28.  A: 4.  C: 2.  A: 2.  C: 3.  A: 2.  C: 2.  A: 5.  C: 2.  A: 2.  C: 3.  A: 2.  C: 2.  A: 4.  Ch 1 and turn.

Rows 29-30.  A: 4.  C: 1.  A: 4.  C: 1.  A: 4.  C: 1.  A: 5.  C: 1.  A: 4.  C: 1.  A: 4.  C: 1.  A: 4.  Ch 1 and turn.

Rows 31-34.  Using Colour A, sc in each st across, ch 1 and turn.

Do not fasten off.  You will now work sc sts with Colour A around the edge of your square to finish it off nicely. You could also use one of the other colours if you prefer. 

With the RS facing, work 34 sc across the top of the square.  In the final st, work 3 sc to form the corner.   Sc 32 sts down the side of the square, placing a st in the end of each row.  In the final st, work 3 sc to form the corner.  Sc 33 sts across the bottom and work 3 sc in the final st on this edge.  Work 32 sc up the other side of the square.  In the same st as first st of the edging, place two more sc to finish the final corner, and join to the first sc to close off the edging.

 Fasten off, and weave in the ends.  Make sure to weave the ends toward the WS so they don’t show on the front. Block your square to 8” x 8” if necessary, and voila! It’s ready to be sewn into your blanket!

Make sure to follow along each day on the main CAL page to see all the beautiful patterns for this CAL. If you prefer to have each pattern automatically emailed to you, you can purchase all of the pdf patterns in one convenient bundle for a fraction of the cost! Follow the link below to purchase the bundle.

Thanks so much for crocheting along!