
Radiant Raglan Pullover
/This post may contain affiliate links, meaning that if you click through and make a purchase, I earn a small commission at no extra cost to you. This helps support my business and makes it possible for me to bring you free content.
It’s here, it’s here! My first garment pattern on the blog, and I’m so excited!
The Radiant Raglan was born out of an extremely frustrating design process. I had a totally different idea for this yarn, which was generously provided by The Frosted Stitch. She’s one of my favourite people in this community, and I’m always so happy to work with her incredible colours.

So, more about the process - this yarn colour is called Rococo, which had me thinking of all sorts of fancy ideas! When I got to swatching them up, though, nothing was working out the way I had envisioned… bummer. So I set it aside until this simple yet stunning idea came a long - a Tunisian crochet raglan.
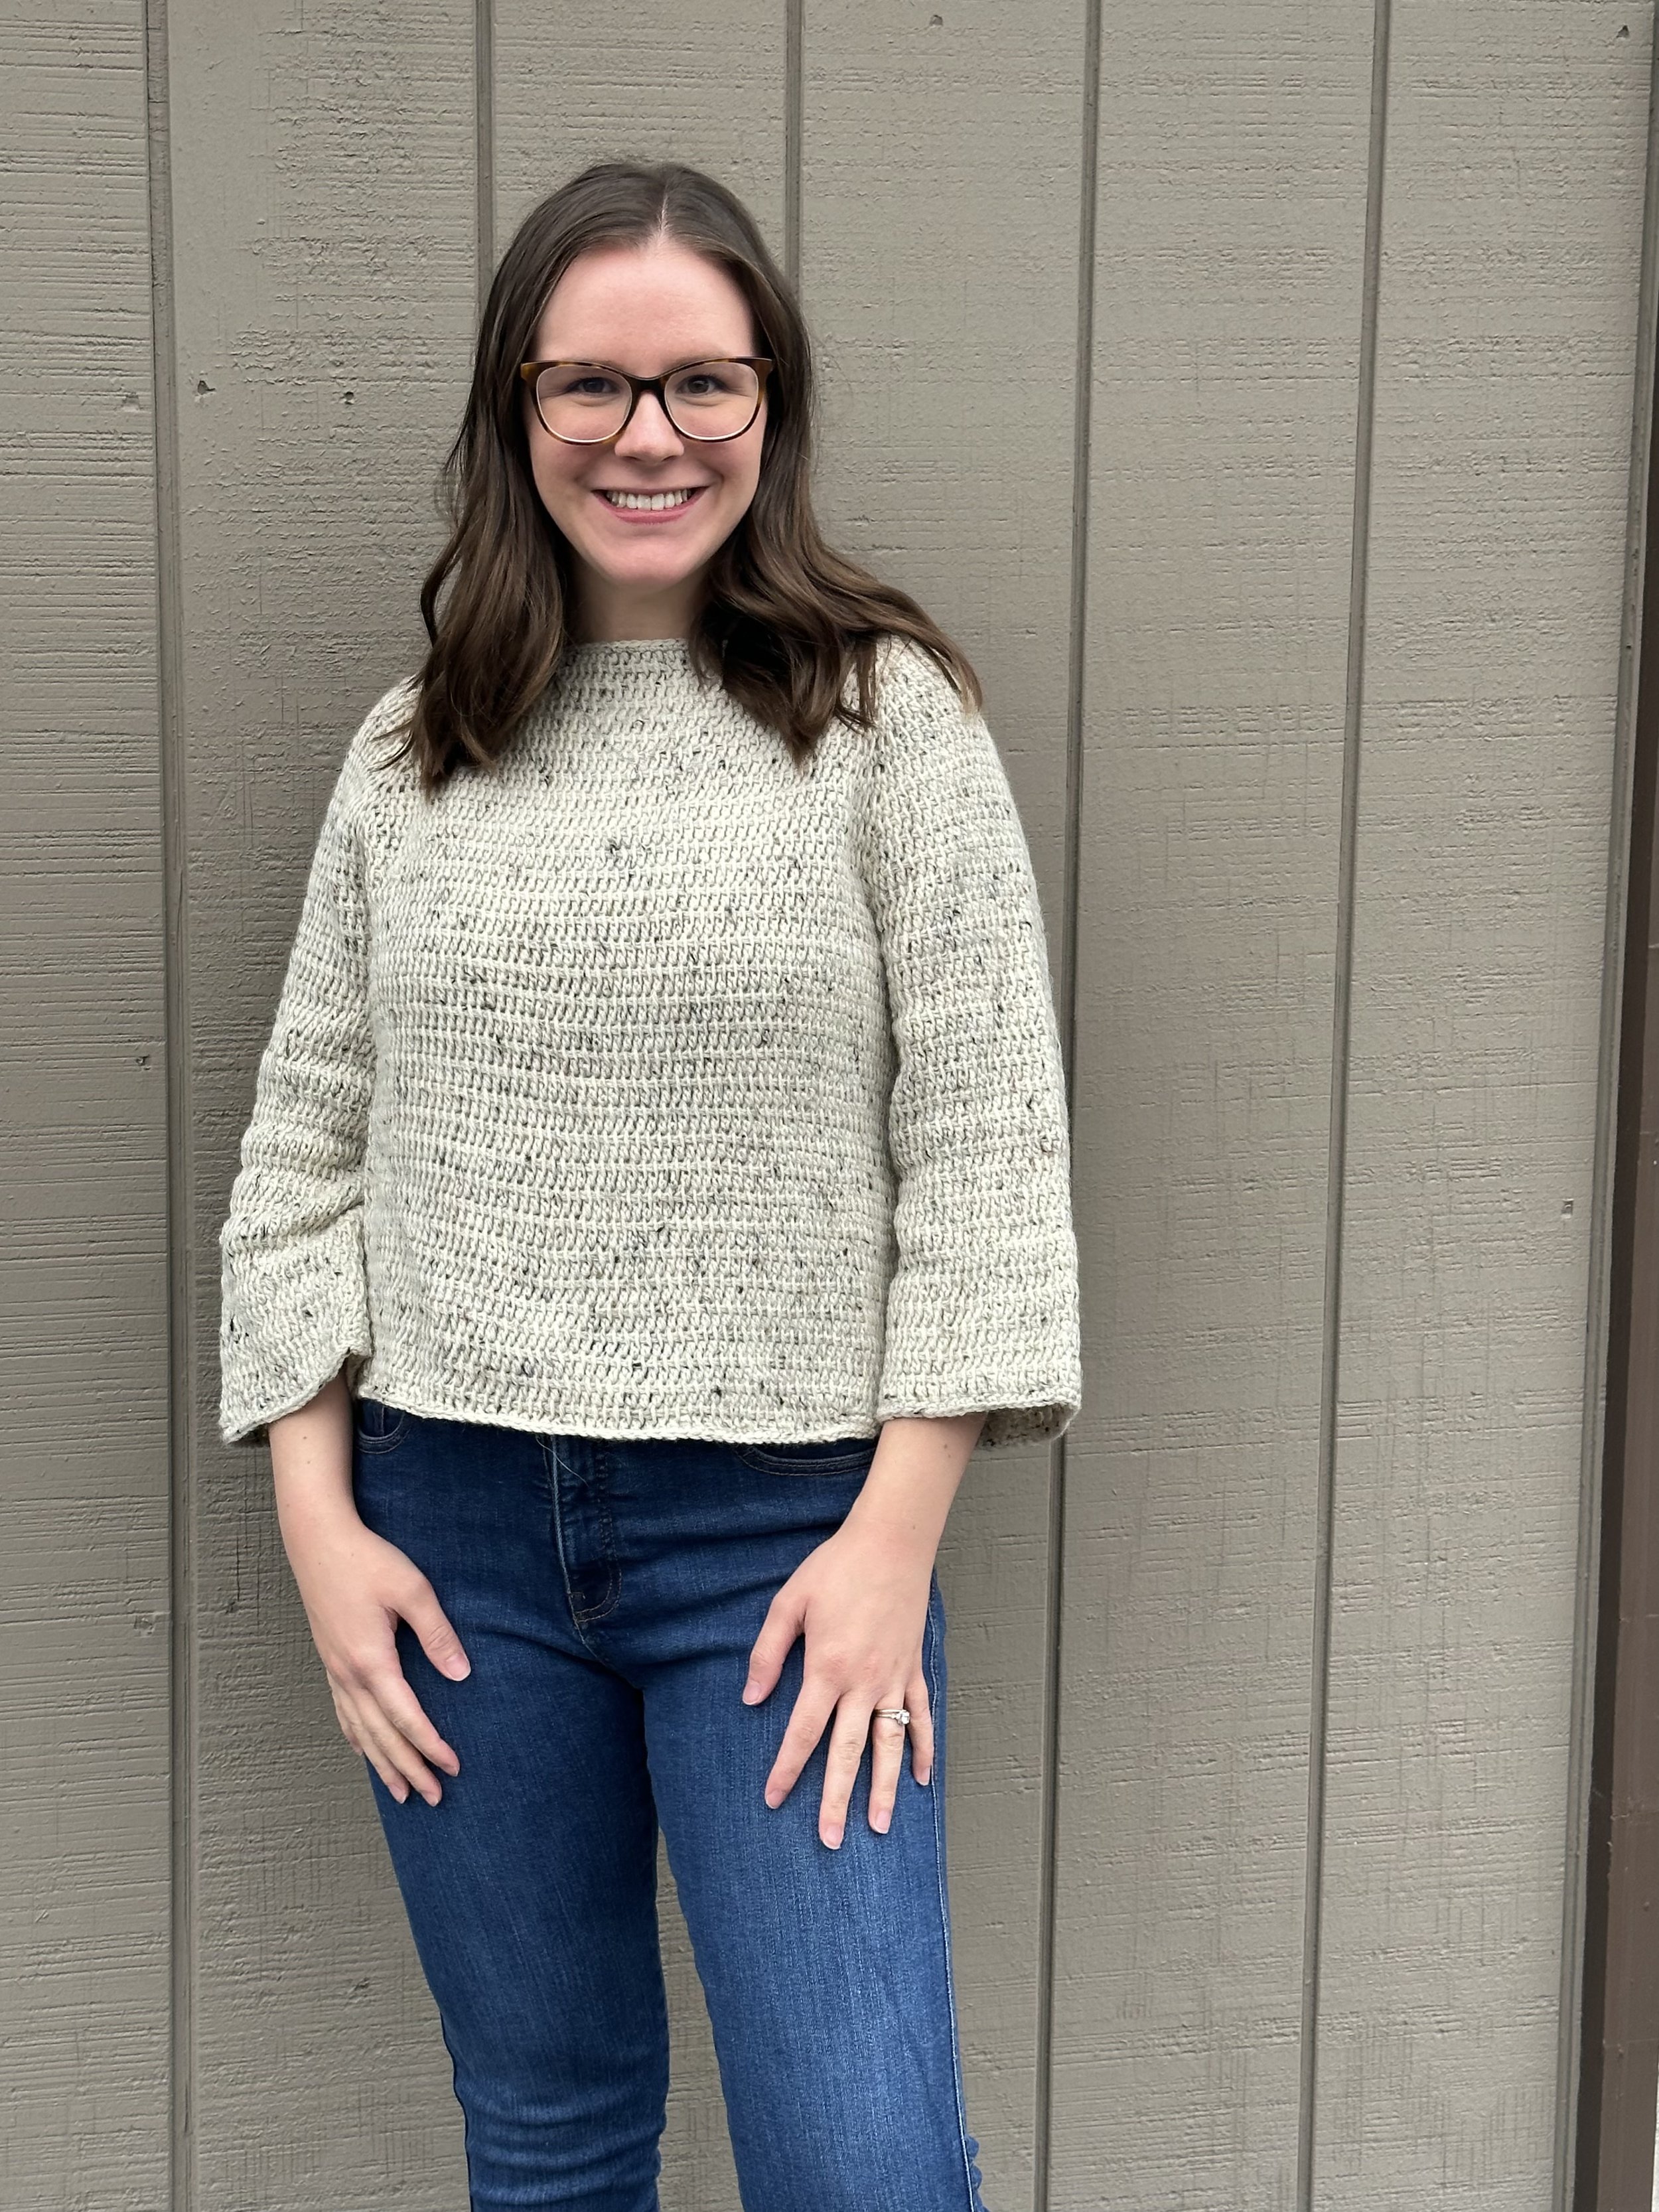
I wanted it to be easy but with a bit of flair, and the Tunisian double crochet stitch does not disappoint! This stitch works really well with all colours of yarn - just look at all the fabulous versions my testers worked up!


I’m pretty excited to finally be publishing a full, size-inclusive garment pattern here for FREE on the blog. It’s something I’ve been meaning to do for a while. Let me know if you appreciate patterns in this format!
If you prefer to work with an ad-free pdf version, you can purchase those in my shop or on Ravelry at the links below.
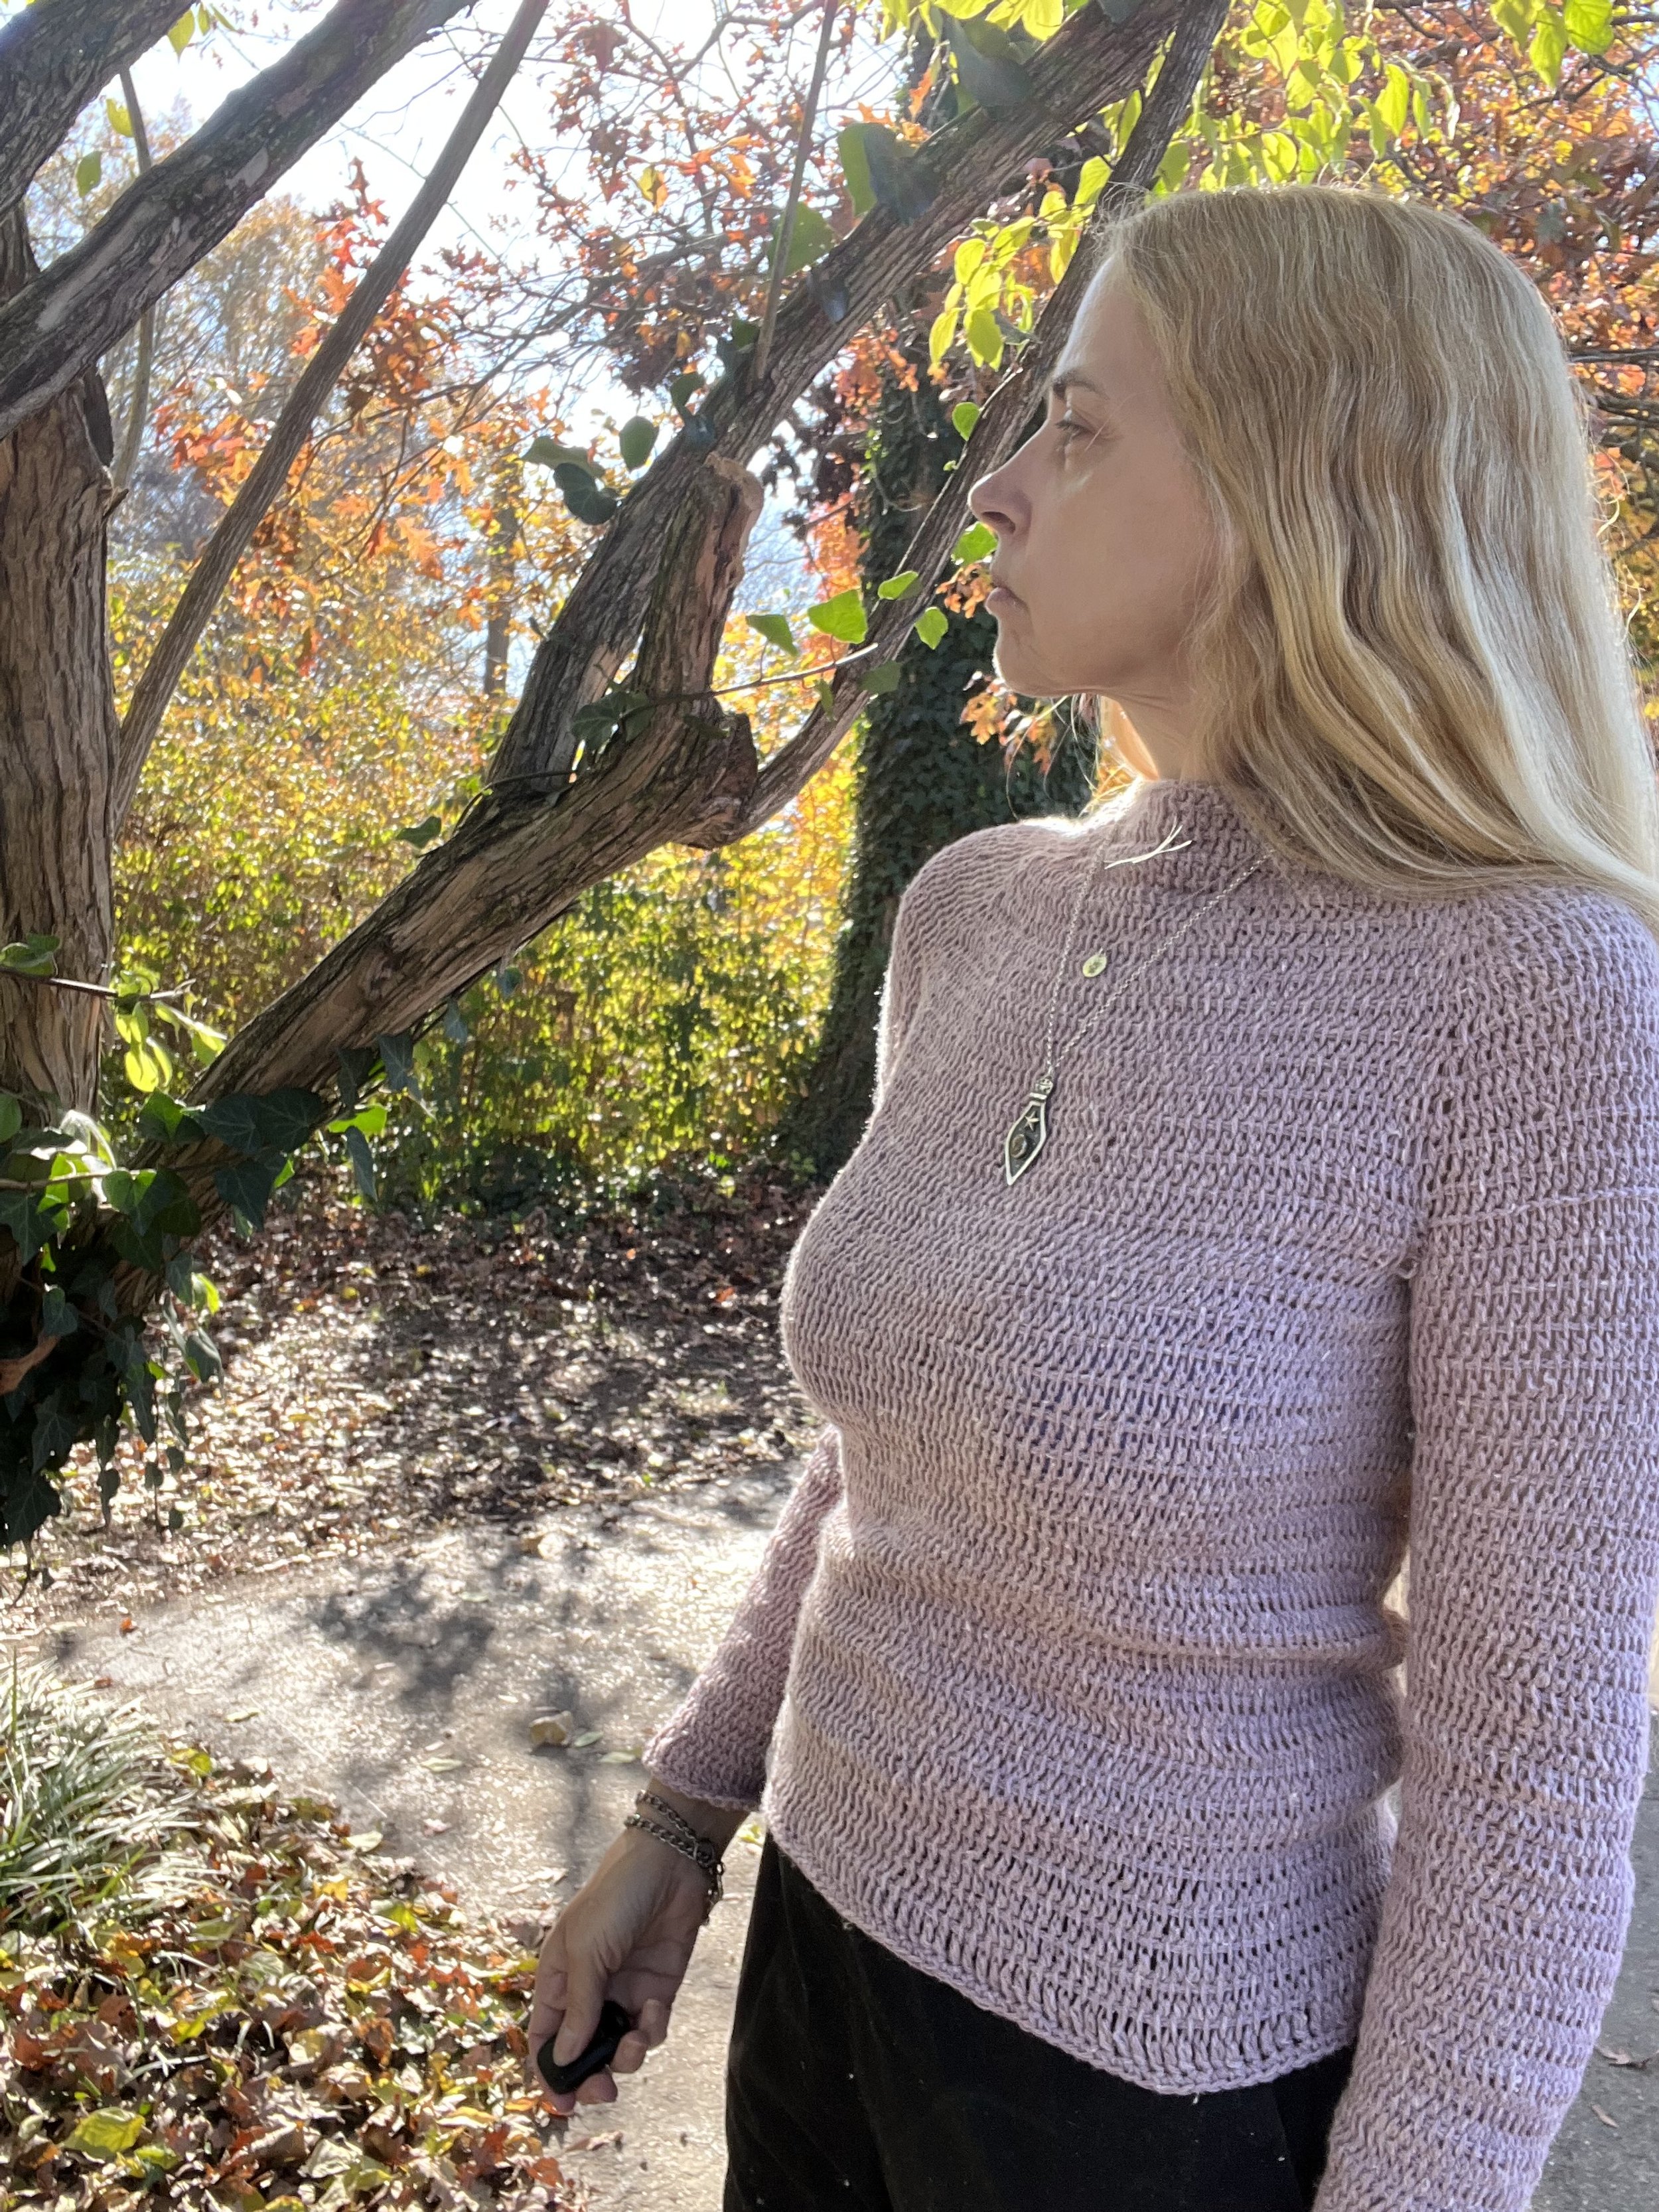
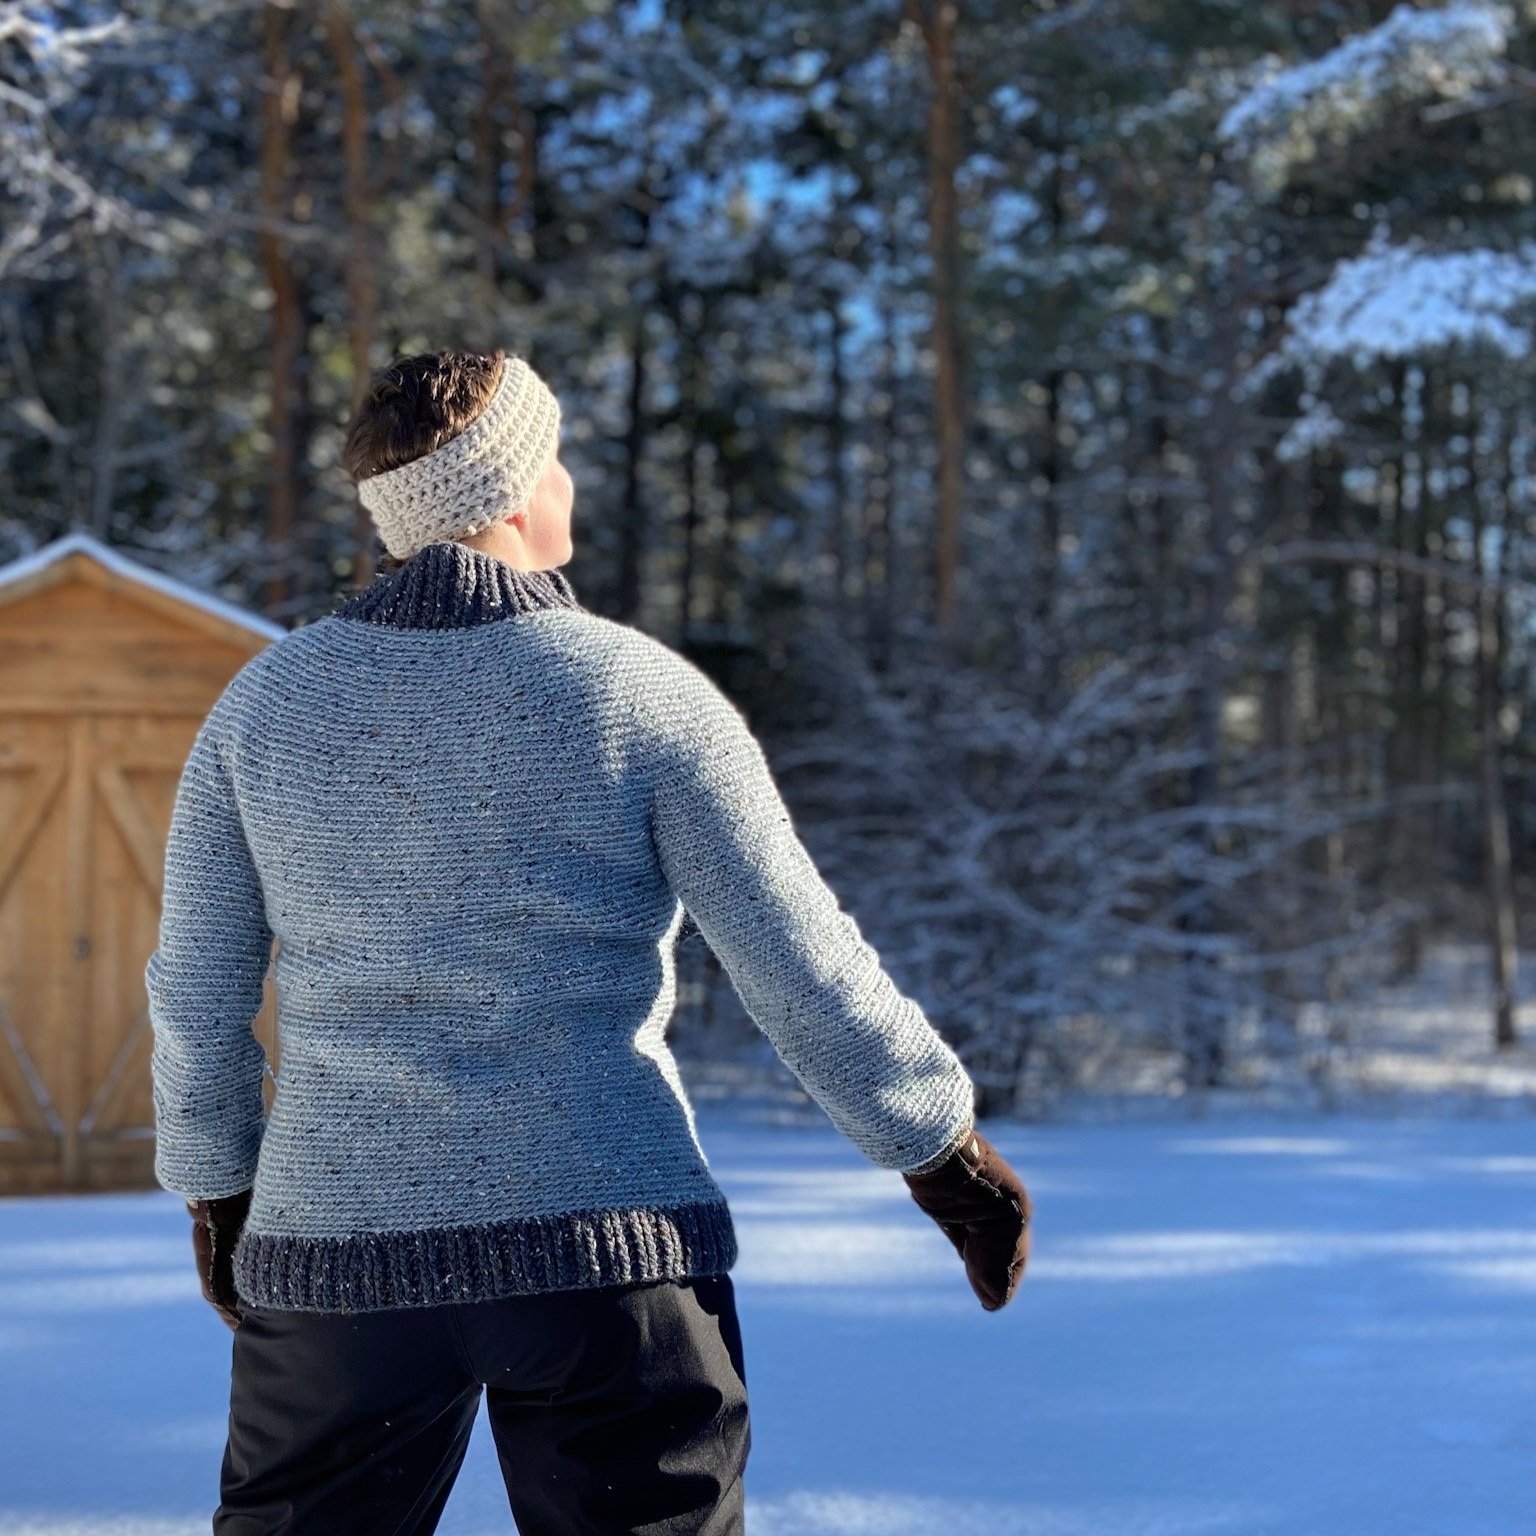
I just love a good raglan line, don’t you?
If you’re all ready to get started, make sure to check out the next section first, which lists all the materials and important information that you’ll need to know before you jump in.
Materials
Yarn: DK (3) weight yarn. See the Sizing section below for yardage. I used The Frosted Stitch Deep Freeze DK (75% superwash merino, 25% nylon, 245 yds/224m per 100g). Testers used 100% superwash merino, acrylic and cotton/acrylic blend yarn.
Hooks: US H/5.0 mm double-ended Tunisian crochet hook, or size needed to meet gauge (see Notes section for additional info). Optional hook 1 size smaller for binding off/finishing.
Notions: measuring tape, scissors, locking stitch markers (4, with 1 unique for BOR), yarn needle, blocking materials.
Terminology/Abbreviations
This pattern uses standard US terms as detailed by the Craft Yarn Council:
BOR: beginning of round
ch: chain
dc: double crochet
dec: decrease – work a tdc, but insert your hook under next two bars
hdc: half double crochet
inc: increase – work 2 tdc into the same st
RetP: return pass (see Special Stitches/Techniques)
sc: single crochet
sl st: slip stitch
st(s): stitch(es)
Tdc: Tunisian double crochet (see Special Stitches/Techniques)
Special Stitches/Techniques
RetP in the round: the RetP in the round is worked a little differently than when working flat, but still involves chaining one and pulling through two loops. This video demonstrates the technique. This pattern does not include explicit instructions for the RetP, but it is implied.
Tunisian double crochet (Tdc): yarn over, insert hook under next vertical bar. Yarn over and pull up a loop, yarn over and pull through two loops. See this video for a demonstration.
Backwards cast-on: this video shows how to use this technique for knitting, but it is done the same for this pattern, working the loops onto your hook.
Gauge
Do not skip this step! This will give you an idea of how the fabric of your sweater will look, and ensure that your finished sweater is the proper size.
Tdc in the round: 16 sts x 7 rounds = 4”/10cm blocked
To make your swatch:
Foundation Chain: Ch 40 and join in the round. Ch 1.
Round 1: Tdc into the back bumps of each st, working the RetP in the round. Do not join; you will work your first st of Round 2 directly into the first st of Round 1.
Round 2: Tdc in each st around.
Rounds 3-9: Repeat Round 2.
Round 10: Bind off by working a regular dc st into each tdc. Join to the first dc of the round and fasten off.
Block your swatch, then lay it flat and measure a 4” x 4”/10cm x 10cm square in the middle of the swatch.
If have more than 16 sts or 7 rounds, your gauge is too tight; try increasing your hook size. If you have fewer than 16 sts or 7 rounds, your gauge is too big; try decreasing your hook size. You may also consider changing yarns to meet gauge as well.
Take note of how much your gauge swatch changes when you block it. If it grows quite a bit, then your sweater will likely fit smaller as you are making it. If it doesn’t grow very much or at all, then the finished sweater will likely be approximately the same size before and after blocking. This can help you judge the sizing as you’re making your sweater, and help you estimate any adjustments that may need to be made.
Also keep in mind that finished sweaters have weight to them. Your sleeves and body will likely stretch out slightly with wear, as much as an inch or two to the finished length, depending on the fibre content of your yarn.
Notes
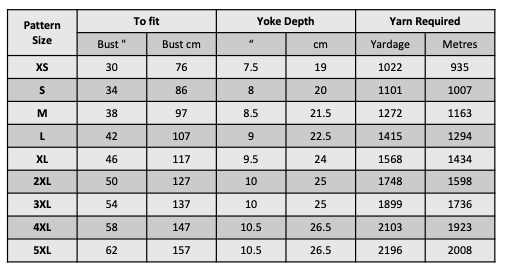
This pattern is written for Women’s sizes XS (S, M, L, XL)(2XL, 3XL, 4XL, 5XL) in accordance with Craft Yarn Council standards (see size chart on page 5). It is meant to fit loosely, with 4-7”/10-17.5cm of positive ease at the bust. There is no shaping through the body and the sleeves are wide and flowy.
It is helpful to fully read through the pattern before starting, and highlight all the size-specific instructions for the size you are making.
If an instruction has an “x” it means there are no instructions for that size in that round.
Numbers at the end of some instructions are the st counts for each size.
This pattern is worked in the round. You will need two strands of yarn, one for the forward pass and one for the return pass. If you have not worked with RetP in the round before, make sure to watch the tutorial linked in the Special Stitches section, and you may wish to try it out with scrap yarn before getting started on your gauge swatch. This will help you get the feel for it and ensure even tension for your sweater.
If you are using interchangeable hooks and do not have two hook ends that are the same size, try using different sizes as follows. Always make sure you meet gauge to ensure your sweater fits as intended.
If you are a loose crocheter, use the smaller hook end for your RetP
If you tend to crochet tightly, use the larger hook end for your RetP
Example: use a 5mm hook end for your forward pass, and a 4 or 4.5mm for your RetP (loose) OR use a 5.5mm for your RetP (tight)
You may wish to use a marker to keep track of the BOR on the Body and Sleeves.
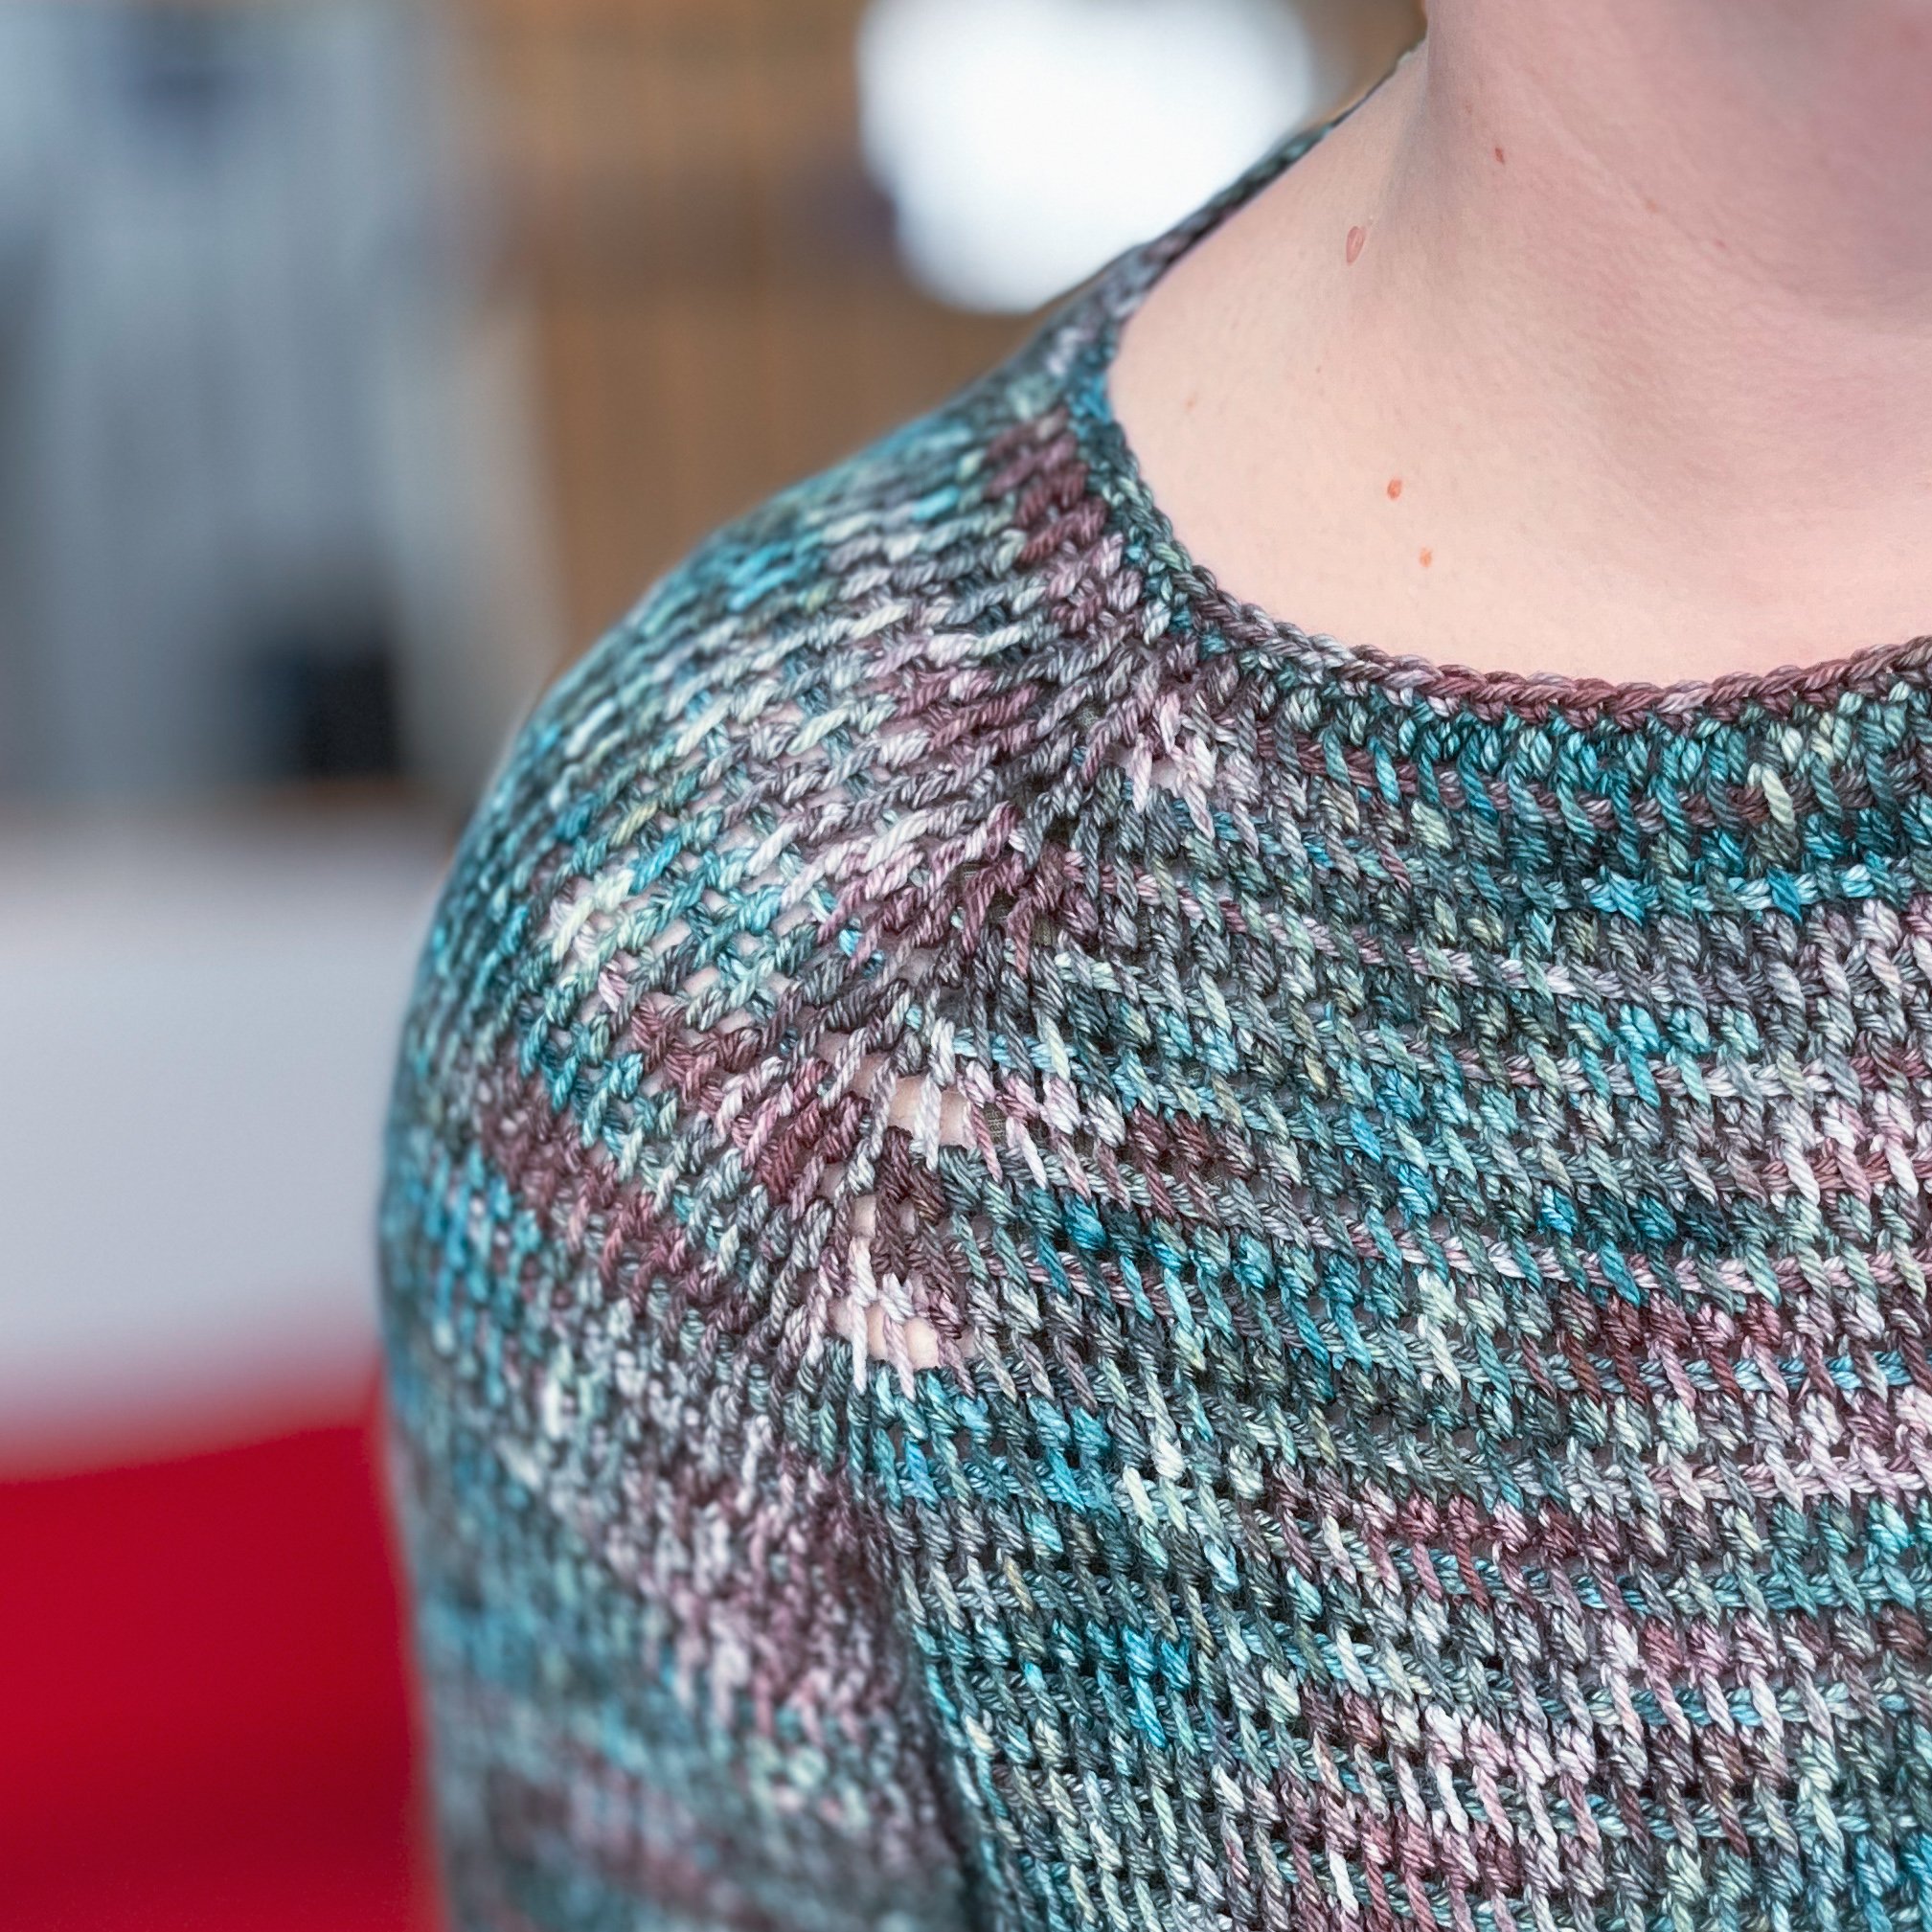
You may find that as you work your yoke, the raglan lines do not appear symmetrical. This can be corrected when you block your sweater; see the Blocking section for details.
Sizing
Choose a size based on your actual bust measurement. Bust size listed will have 4”/10 cm of ease; if you are between sizes, it is recommended to choose the next size up for more positive ease at the bust, or size down for a tighter fit if you prefer that. For example, if you have a 35”/88cm bust, choose size M for a looser fit, or size S for a tight fit through the bust.
The length of the sweater and the sleeves are customizable, and therefore exact measurements are not provided. You will work until your desired length, keeping in mind that the finishing rounds add about .75”/2cm.
For reference, the size I made is a L, and I have a 43”/110cm bust. My sample has 24 Body rounds and 29 Sleeve rounds (before the finishing rounds). It fits fairly loosely on me, but is not quite in the “oversized” style category, if that makes sense.
Yardage has been conservatively estimated, and everyone’s yardage will vary from the amounts listed. If you have a longer torso and or/arms, or if you prefer a longer sweater, you may require slightly more yardage than what is listed (not likely, but possible). If you make a shorter sweater and/or sleeves, you may not require as much.
Raglan Rounds
The yoke of this sweater is worked in raglan rounds, increasing at the corners of each round from the neckline down to the underarm. You will be working the front, back and the tops of both sleeves simultaneously.
The yoke uses three different increase rounds, as detailed below. If you are using a digital copy of the pattern, it may be helpful to print or screenshot this page and have it beside you when following along with the pattern instructions.
Note: When instructed to tdc into next space, work into the space between the st you just worked and the next st. This is how the raglan corners increase.
ROUND A – increase by 8 sts overall, increasing evenly on all sides
Tdc in BOR. Tdc into next space, *tdc until next marker. Tdc into space before marked st, tdc marked st, tdc into space after marked st. Repeat from * twice more. Tdc until BOR, tdc into space before BOR.
ROUND B – increase by 16 sts overall, increasing evenly on all sides
Tdc in BOR. *Tdc into next space, tdc next st, tdc into next space. Tdc until 1 st remains before next marker, tdc into next space, tdc next st,** tdc into space before marked st, tdc marked st. Repeat from * twice more, then repeat from * to **. Tdc into space before BOR.
ROUND C – increase by 8 sts overall, increasing on front and back sides only
Tdc in BOR. *Tdc until marked st, tdc marked st. Tdc next space, tdc next st, tdc next space. Tdc until 1 st remains before next marker. Tdc next space, tdc next st, tdc next space,** tdc marked st. Repeat from * to **.

Pattern Instructions
YOKE
The yoke is worked in continuous rounds, without joining (except for Round 1) or turning.
Foundation Chain: Ch 80 (80, 88, 88, 88)(96, 96, 104, 104). Taking care not to twist your work, join with a sl st to first st.
Round 1: Ch 1, tdc in the back bump of each st around, placing markers in the following sts: 1 (all sizes, BOR), 11 (11, 11, 9, 9)(9, 9, 7, 7), 41 (41, 45, 45, 45)(49, 49, 53, 53) and 51 (51, 55, 53, 53)(57, 57, 59, 59). Do not join; start continuous rounds.
Round 2: A (A, A, A, A)(A, B, A, B). <88 (88, 96, 96, 96)(104, 112, 112, 120) sts>
Round 3: B (all sizes). <104 (104, 112, 112, 112)(120, 128, 128, 136) sts>
Round 4: A (all sizes). <112 (112, 120, 120, 120)(128, 136, 136, 144) sts>
Round 5: B (all sizes). <128 (128, 136, 136, 136)(144, 152, 152, 160) sts>
Round 6: A (A, A, A, A)(A, B, A, B). <136 (136, 144, 144, 144)(152, 168, 160, 176) sts>
Round 7: A (B, B, B, B)(B, A, B, A). <144 (152, 160, 160, 160)(168, 176, 176, 184) sts>
Round 8: A (A, A, A, A)(A, B, A, B). <152 (160, 168, 168, 168)(176, 192, 184, 200) sts>
Round 9: A (C, B, B, B)(B, B, B, B). <160 (168, 184, 184, 184)(192, 208, 200, 216) sts>
Round 10: A (all sizes). <168 (176, 192, 192, 192)(200, 216, 208, 224) sts>
Round 11: A (C, A, B, B)(B, B, B, B). <176 (184, 200, 208, 208)(216, 232, 224, 240) sts>
Round 12: A (A, A, A, A)(A, B, A, B). <184 (192, 208, 216, 216)(224, 248, 232, 256) sts>
Round 13: A (A, A, B, B)(B, A, B, A). <192 (200, 216, 232, 232)(240, 256, 248, 264) sts>
Sizes XS only: do not fasten off – proceed to Body section.
Round 14: x (A, A, A, A)(A, B, A, B). <x (208, 224, 240, 240)(248, 272, 256, 280) sts>
Size S only: do not fasten off – proceed to Body section.
Round 15: x (x, C, C, C)(B, B, B, C). <x (x, 232, 248, 248)(264, 288, 272, 288) sts>
Size M only: do not fasten off – proceed to Body section.
Round 16: x (x, x, A, A)(A, C, A, A). <x (x, x, 256, 256)(272, 296, 280, 296) sts>
Size L only: do not fasten off – proceed to Body section.
Round 17: x (x, x, x, C)(C, B, B, B). <x (x, x, x, 264)(280, 312, 296, 312) sts>
Size XL only: do not fasten off – proceed to Body section.
Round 18: x (x, x, x, x)(C, C, A, C). <x (x, x, x, x)(288, 320, 304, 320) sts>
Size 2XL and 3XL only: do not fasten off – proceed to Body section.
Round 19: x (x, x, x, x)(x, x, C, C). <x (x, x, x, x)(x, x, 312, 328) sts>
Sizes 4XL and 5XL: do not fasten off – proceed to Body section.
BODY
You will now split the sleeves from the body section of your sweater, and work continuous rounds until your sweater reaches the length you want it to be. There is no increasing or decreasing in this section.
Split Round: Tdc BOR. *Cast on 10 (10, 12, 12, 16)(16, 16, 24, 24) sts using the backwards cast-on method, and keep these sts fairly loose so they are easier to work into on the next round. Fold the yoke so that you can work into the next marked st (skipping all the sts on the sleeve section). Tdc marked st, tdc each st until next marker,** tdc marked st. Repeat from * to **. <138 (154, 170, 186, 202)(218, 234, 250, 266) sts>
Round 1: Tdc BOR (you may remove all markers now), tdc each st around. Place a marker into one of the middle cast on sts in each underarm section.
You should try on your sweater at this point to see how it fits. If the underarms are tight (and not likely to relax with blocking), you may wish to continue the yoke to the next size up.
Repeat Round 1 until your sweater reaches desired length. The Bind Off and Finishing Rounds will add approximately 0.75”/2cm, and remember to consider blocking and the weight of the finished sweater when determining how long to make the body. Stop the last round at one of the sides (the exact spot is not important).
Bind Off Round: Drop your RetP yarn (cut it and leave a 6”/15cm tail to weave in later) and continue with one strand only. Dc into each st around, inserting your hook under the vertical bar of the st below. TIP: you may wish to use a slightly smaller hook for this round. If you notice that this round feels looser or that it is not laying flat, feel free to size down your hook.
When you finish the Bind Off Round, there will be a significant difference in height between the first and last sts of the round. The Finishing Round will help to even that out, and you can further minimize any difference when you block your finished sweater.
Finishing Round: Hdc into the next 4 sts. Sc into each st around, until you get to the last 4 sts. Sl st in these last 4 sts, sl st into the 4 hdc sts and join with a sl st to the first sc of the round. Fasten off and proceed to Sleeves section.
SLEEVES
The sleeves are worked in continuous rounds, just like the Body. They are meant to be loose and flowy, but you are totally welcome to customize for a more tapered fit.
Join yarn to the marked st of the underarm section, loosely ch 1.
Round 1: Tdc into each st of the underarm section to the corner, tdc into the side of the last tdc st of the Split Round. Tdc each st along the Sleeve edge of the yoke until you reach the other corner, tdc into the side of the tdc st of the Split Round and tdc into the remaining underarm sts. Do not join, as you will start continuous rounds. <49 (49, 57, 61, 65)(69, 77, 81, 81) sts>
Exact st count here is not important, as long as it is close and there are no big holes or bunching fabric in the underarm section.
You can mark the BOR if you like to help you track where to put your decreases.
For a straight sleeve with no tapering, repeat Round 1 until sleeve reaches desired length (keep in mind that the Bind Off and Finishing Rounds will add approx. 0.75”/2cm). Take note of the number of rounds you work so that you can do the same on the second sleeve.
If you would like a closer-fitting sleeve, work a few decrease rounds as follows:
Decrease Round: Tdc BOR, dec, tdc in remaining sts.
If you want a looser fit, work more repeats of Round 1 between decreases, and if you want a closer fit, work fewer repeats of Round 1 between decreases.
I recommend working 3-7 repeats of Round 1, then a Decrease Round. Make sure to take note of what you do for the first sleeve, so that you can repeat the same thing for the second sleeve.
Sample shown is worked with 6 repeats of Round 1, then a decrease round for a total of 29 rounds.
Bind Off Round: Drop your RetP yarn (cut it and leave a 6”/15cm tail to weave in later) and continue with one strand only. Dc into each st around, inserting your hook under the vertical bar of the st below. TIP: you may wish to use a slightly smaller hook for this round. If you notice that this round feels looser or that it is not laying flat, feel free to size down your hook.
When you finish the Bind Off Round, there will be a significant difference in height between the first and last sts of the round. The Finishing Round will help to even that out, and you can further minimize the difference when you block your finished sweater.
Finishing Round: Hdc into the next 4 sts. Sc into each st around, until you get to the last 4 sts. Sl st in these last 4 sts, sl st into the 4 hdc sts and join with a sl st to the first sc of the round. Fasten off.
Repeat for the second sleeve, and proceed to Neckline section.
NECKLINE
A round of sc around the neckline helps provide a little bit of structure so it doesn’t get stretched out, and finishes this edge off nicely. TIP: I actually blocked my sweater before doing this round, feel free to do the same! You can also use a smaller hook here if you find the stitches are a little too loose for your liking.
Round 1: With RS facing, join yarn at the same corner where your BOR was for the Yoke section. This will become the back side of your sweater. Ch 1, sc in each st around, and join with a sl st to the first st of the round. Fasten off.
BLOCKING
Block according to the fibre you’ve used. I like to soak my garments in a sink filled with cool water and a non-rinse wash like Soak, roll it up in a towel to squeeze out excess water, then lay it out flat and shape it on blocking mats or a towel.
You can take this opportunity to even out the raglan lines by slightly stretching and pinning (if necessary) the yoke so that the raglan lines are even on both sides, front and back. You can also shape the hem and sleeve edges where there may still be some unevenness in the Finishing Rounds.

Weave in all ends to the wrong side of your sweater. I like to save this until after blocking so that the yarn is free to settle without puckering or distorting the shape of the garment. Turn your sweater so the right side is facing, and voila, you’re finished!
Save this pattern to your Ravelry queue, or add a project to the pattern page!

Can’t make this one now? That’s totally ok! Pin this post to your Tunisian Crochet or Sweaters Pinterest board so you’ll be able to easily find it later.
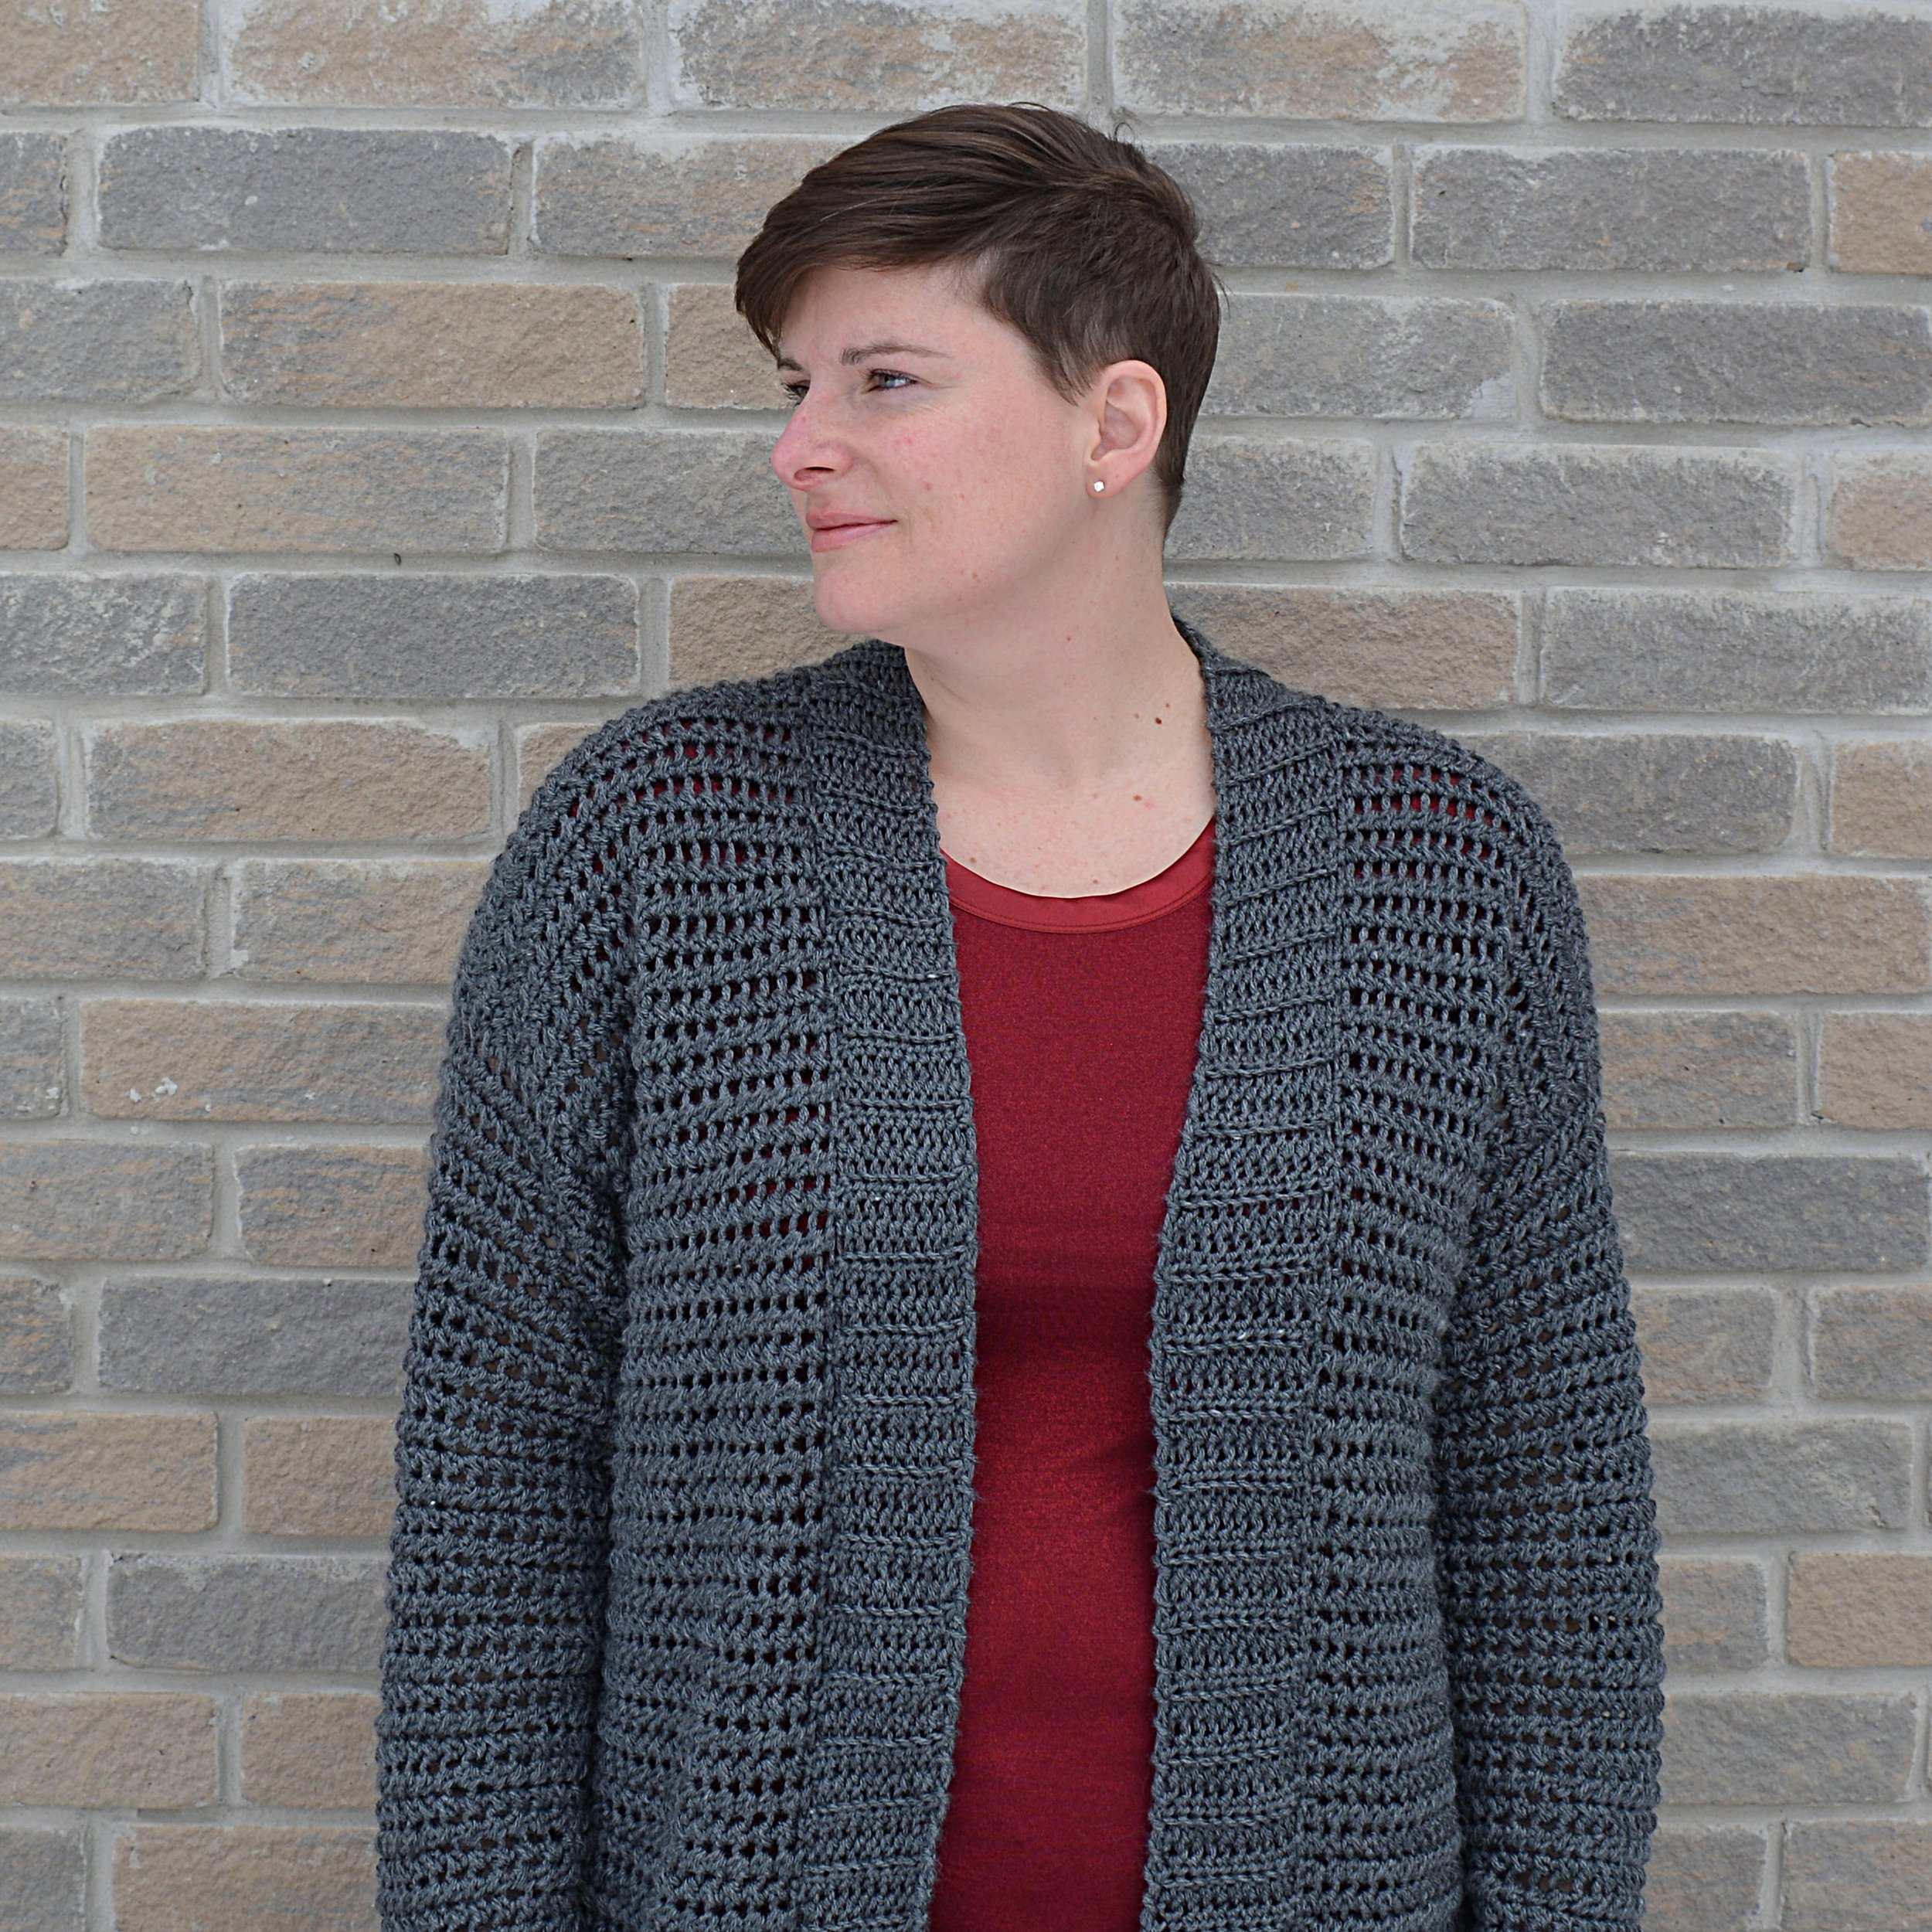
Congratulations on finishing your Radiant Raglan! I love how lightweight and drapey this sweater is, and how good it looks with a pair of jeans.
I really hope you enjoy making this sweater as much as I have enjoyed designing it! I can tell you that it has been a permanent fixture in my sweater rotation ever since I finished it, and I hope you get the same satisfaction with yours.
Share your sweater on Instagram using the hashtag #RadiantRaglan and tag me, @capital.crochet!
You may sell finished items made from this pattern, and I would appreciate if you credit me as the designer by linking back to this blog post.


If you enjoyed this pattern, check out my other crochet sweaters! Most of them follow the same formula - a defined, sized yoke to fit your bust size, and then the body and sleeves are customizable to suit you. That way, you get a garment that fits you just the way you like it.
Thank you so much for your support! If you’d like to be the first to know about new patterns and blog posts, make sure to subscribe to my newsletter below.
